
در این قسمت از آموزش کار کردن با MongoDB که به صورت رایگان از وب سایت پرووید به شما تقدیم می گردد، در رابطه با MongoDB Server صحبت خواهیم کرد.
پس از آن نحوه اجرا کردن MongoDB Server را به صورت دستی بررسی خواهیم نمود. ضمناً تنظیم کردن تنظیمات پیکربندی و یا configuration settings را در MongoDB Server بررسی خواهیم نمود.
در قسمت قبلی MongoDB Server را به عنوان یک ویندوز سرویس نصب کردیم. MongoDB windows service می تواند در زمان آغاز به کار کردن سیستم و یا همان startup اجرا شود. این موضوع در تصویر زیر نشان داده شده است.
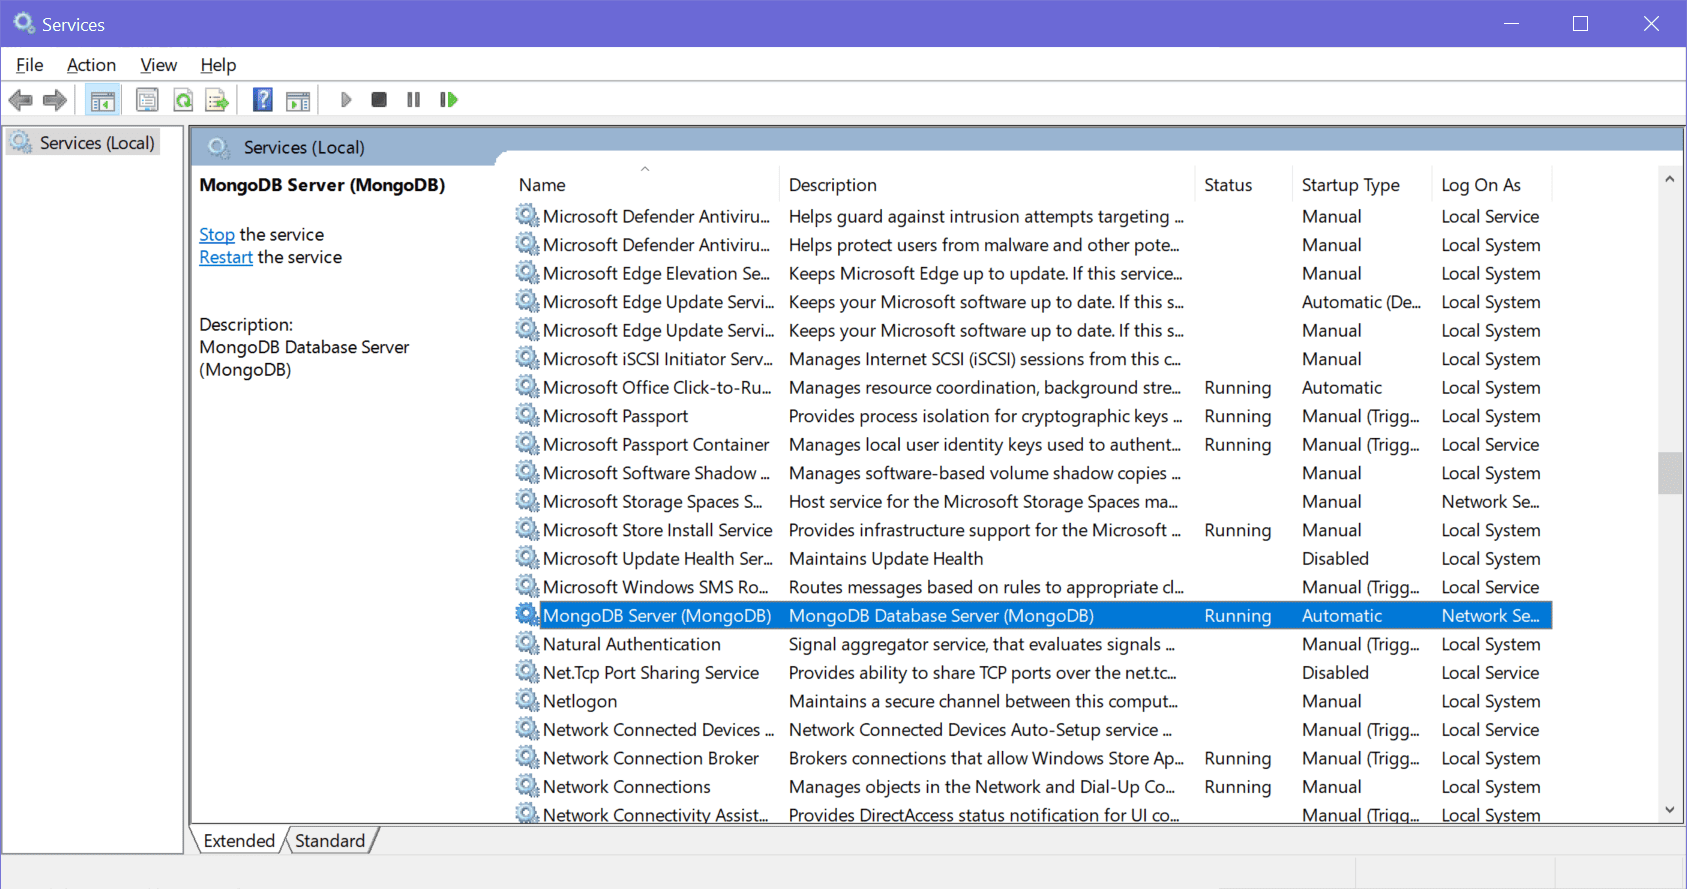
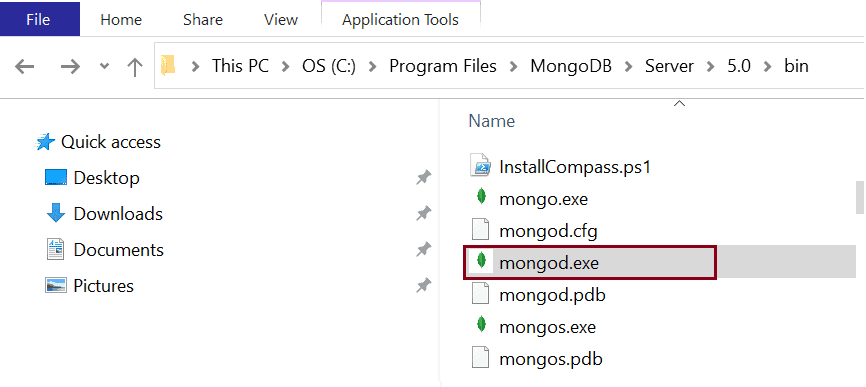
به صورت درونی MongoDB service کار خود را با اجرا کردن MongoDB server محلی و یا local در آدرس پیش فرض http://127.0.0.1:27017 آغاز خواهد کرد. این موضوع به صورت خودکار زمانی انجام می شود که سیستم آغاز به کار می کند. MongoDB server در قالب یک فایل اجرایی به نام mongod.exe در ویندوز نصب می شود. این موضوع در تصویر زیر نیز نشان داده شده است.
بنابراین mongod که همان MongoDB server است، می تواند هم به صورت دستی و هم به صورت خودکار آغاز و خاتمه پیدا کند. این موضوع بدان دلیل اتفاق می افتد که MongoDB server در قالب یک سرویس در ویندوز، کار خود را انجام می دهند.
اگر MongoDB را به عنوان یک windows service نصب کرده اید، می توانید آن را به صورت دستی اجرا و یا حتی متوقف کنید.
در ابتدا باید mongodb install folder/bin را به environment variable های لوکال ماشین خودتان اضافه کنید. بنابراین در قسمت سرچ مربوط به ویندوز کلمه این Environment را تایپ کرده و سپس بر روی گزینه Edit the system environment variable کلیک کنید این موضوع پنجره system properties را شبیه به تصویر زیر به شما نمایش می دهد.
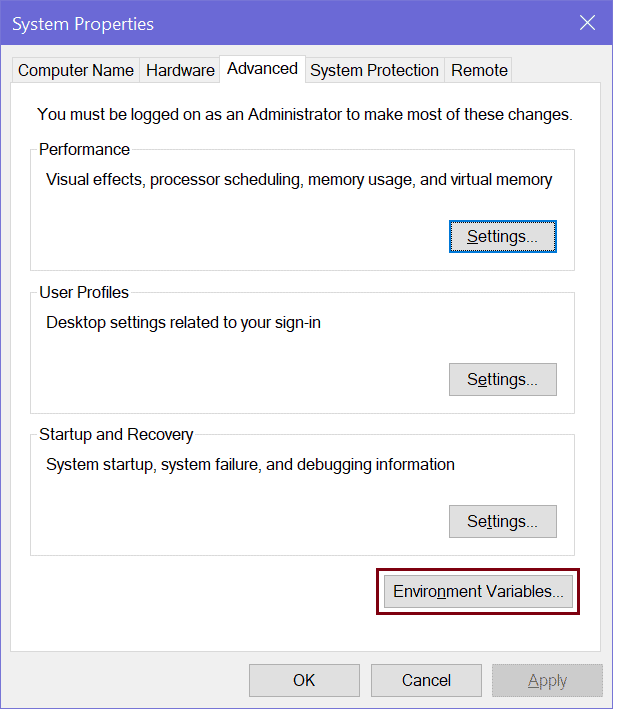
پس از آن بر روی گزینهی Environment Variablesکلیک کنید تا بتوانید path و یا مسیر را شبیه به تصویر زیر ویرایش کنید.
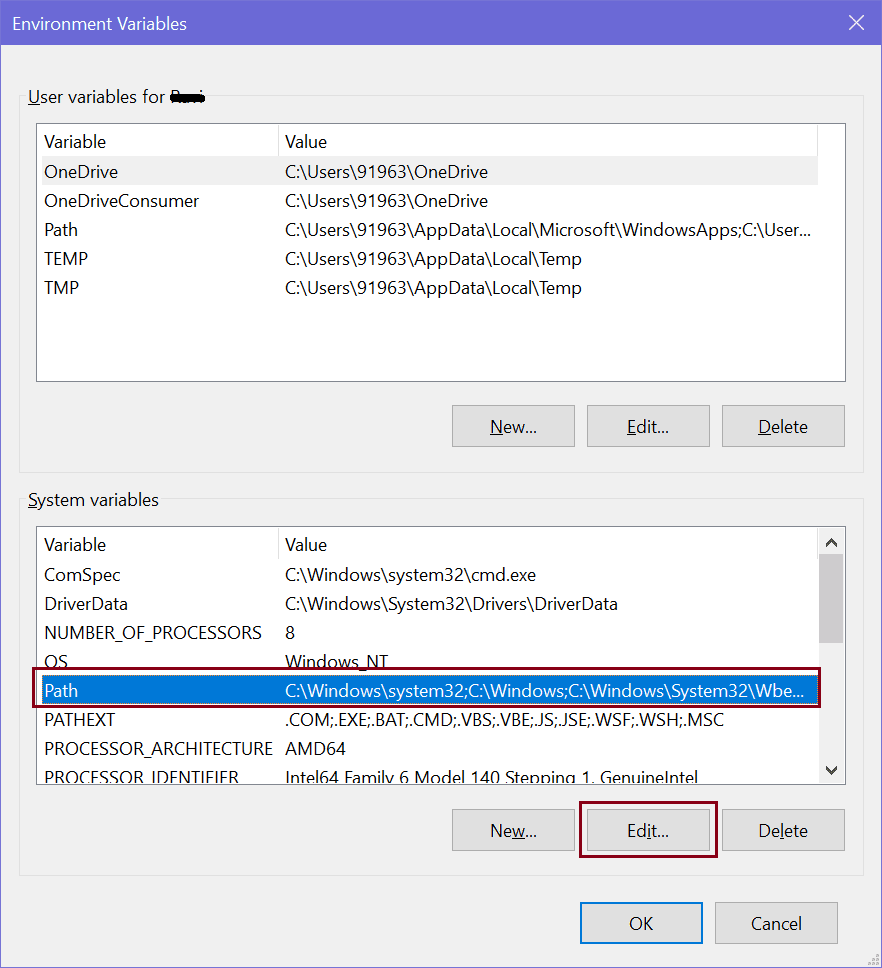
پس از آن، در قسمت Path که در پایین پنجره قرار گرفته است کلیک کنید و بر روی دکمه Edit کلیک نمایید. این موضوع باعث می شود که پنجره Edit environment variable را باز شود. پس از آن بر روی دکمه New کلیک کنید تا بتوانید فولدر مربوط به MongoDB که به صورت پیش فرض “C:Program FilesMongoDBServer5.0bin” می باشد را شبیه به تصویر زیر اضافه نمایید.
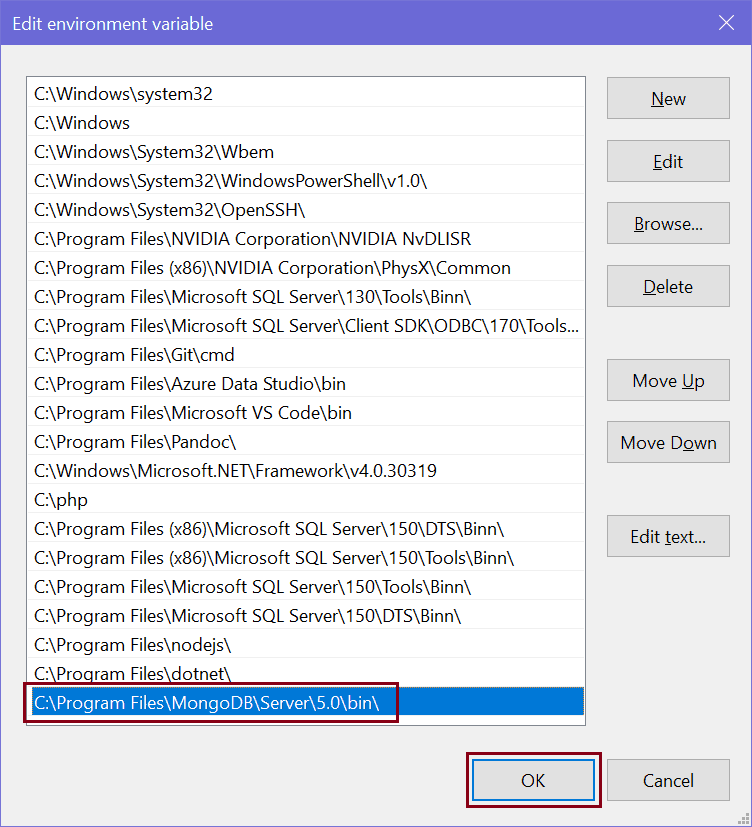
پس از آن بر روی دکمه OK کلیک کنید تا تمامی پنجره ها بسته شوند.
اضافه کردن مسیر فولدر و یا folder path مربوط به MongoDB به این environment variable های سیستم به ما اجازه می دهند تا بتوانیم mongod.exe را با استفاده از command prompt در هر مسیری اجرا کنیم.
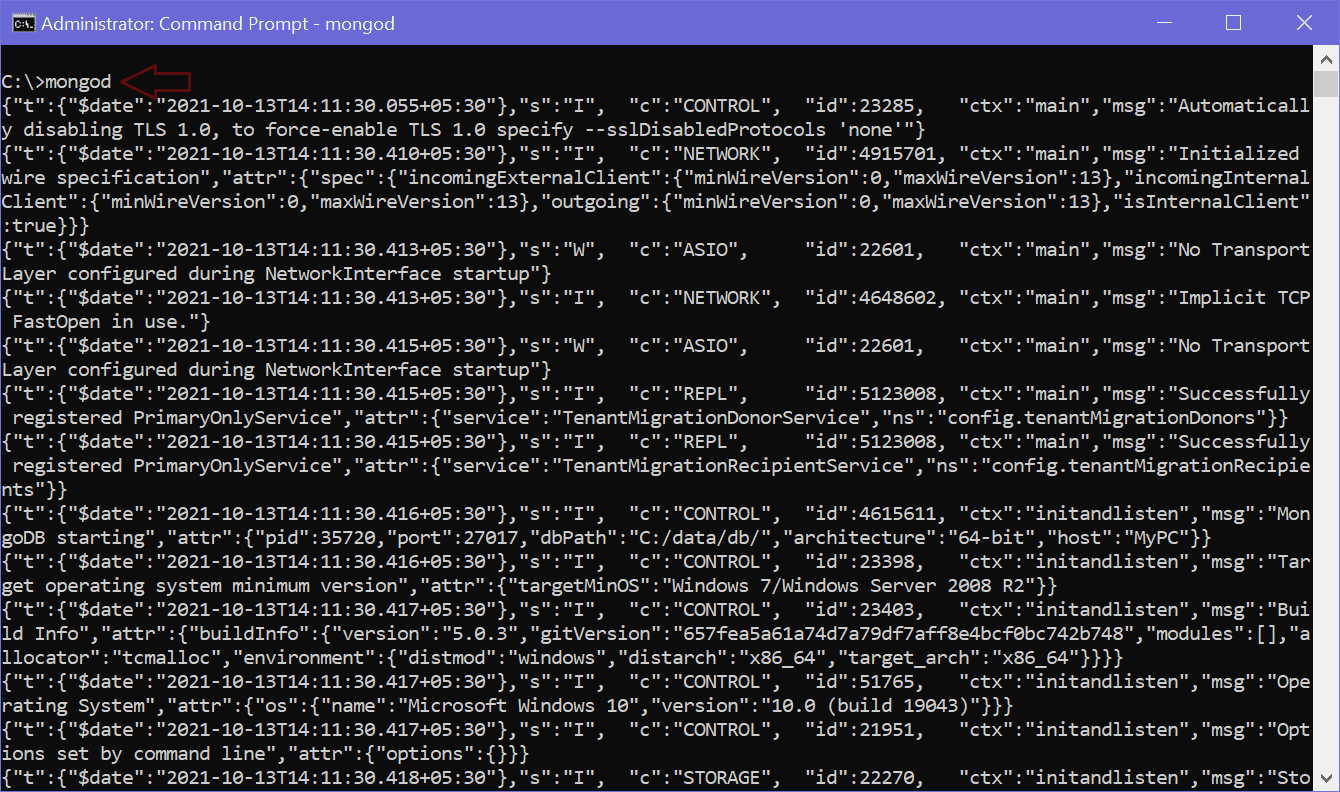
حال یک پنجره جدید از command prompt را در ویندوز باز کرده و سپس دستور mongod را اجرا نمایید. اگر در حال استفاده کردن از MongoDB در سیستم عامل مک هستید، بایستی که دستور sudo mongod را به منظور اجرا کردن MongoDB server لحاظ کنید. این موضوع در تصویر زیر نشان داده شده است.
پس از آن می توانید گزینه های مختلف این دستور را به منظور تست کردن عملکرد آن تنظیم نمایید؛ تصویر زیر لیستی از گزینه های مختلف این دستور را نشان می دهد.
  -h [ --help ]                         Show this usage information
  --version                             Show version information
  -f [ --config ] arg                   Configuration file specifying
                                        additional options
  --configExpand arg                    Process expansion directives in config
                                        file (none, exec, rest)
  --port arg                            Specify port number - 27017 by default
  --ipv6                                Enable IPv6 support (disabled by
                                        default)
  --listenBacklog arg (=2147483647)     Set socket listen backlog size
  --maxConns arg (=1000000)             Max number of simultaneous connections
  --pidfilepath arg                     Full path to pidfile (if not set, no
                                        pidfile is created)
  --timeZoneInfo arg                    Full path to time zone info directory,
                                        e.g. /usr/share/zoneinfo
  -v [ --verbose ] [=arg(=v)]           Be more verbose (include multiple times
                                        for more verbosity e.g. -vvvvv)
  --quiet                               Quieter output
  --logpath arg                         Log file to send write to instead of
                                        stdout - has to be a file, not
                                        directory
  --logappend                           Append to logpath instead of
                                        over-writing
  --logRotate arg                       Set the log rotation behavior
                                        (rename|reopen)
  --timeStampFormat arg                 Desired format for timestamps in log
                                        messages. One of iso8601-utc or
                                        iso8601-local
  --setParameter arg                    Set a configurable parameter
  --bind_ip arg                         Comma separated list of ip addresses to
                                        listen on - localhost by default
  --bind_ip_all                         Bind to all ip addresses
  --noauth                              Run without security
  --transitionToAuth                    For rolling access control upgrade.
                                        Attempt to authenticate over outgoing
                                        connections and proceed regardless of
                                        success. Accept incoming connections
                                        with or without authentication.
  --slowms arg (=100)                   Value of slow for profile and console
                                        log
  --slowOpSampleRate arg (=1)           Fraction of slow ops to include in the
                                        profile and console log
  --profileFilter arg                   Query predicate to control which
                                        operations are logged and profiled
  --auth                                Run with security
  --clusterIpSourceAllowlist arg        Network CIDR specification of permitted
                                        origin for `__system` access
  --profile arg                         0=off 1=slow, 2=all
  --cpu                                 Periodically show cpu and iowait
                                        utilization
  --sysinfo                             Print some diagnostic system
                                        information
  --noscripting                         Disable scripting engine
  --notablescan                         Do not allow table scans
  --keyFile arg                         Private key for cluster authentication
  --clusterAuthMode arg                 Authentication mode used for cluster
                                        authentication. Alternatives are
                                        (keyFile|sendKeyFile|sendX509|x509)

Replication options:
  --oplogSize arg                       Size to use (in MB) for replication op
                                        log. default is 5% of disk space (i.e.
                                        large is good)

Replica set options:
  --replSet arg                         arg is [/]
  --enableMajorityReadConcern [=arg(=1)] (=1)
                                        Enables majority readConcern.
                                        enableMajorityReadConcern=false is no
                                        longer supported

Sharding options:
  --configsvr                           Declare this is a config db of a
                                        cluster; default port 27019; default
                                        dir /data/configdb
  --shardsvr                            Declare this is a shard db of a
                                        cluster; default port 27018

Storage options:
  --storageEngine arg                   What storage engine to use - defaults
                                        to wiredTiger if no data files present
  --dbpath arg                          Directory for datafiles - defaults to
                                        datadb which is C:datadb based on
                                        the current working drive
  --directoryperdb                      Each database will be stored in a
                                        separate directory
  --syncdelay arg (=60)                 Seconds between disk syncs
  --journalCommitInterval arg (=100)    how often to group/batch commit (ms)
  --upgrade                             Upgrade db if needed
  --repair                              Run repair on all dbs
  --journal                             Enable journaling
  --nojournal                           Disable journaling (journaling is on by
                                        default for 64 bit)
  --oplogMinRetentionHours arg (=0)     Minimum number of hours to preserve in
                                        the oplog. Default is 0 (turned off).
                                        Fractions are allowed (e.g. 1.5 hours)

Free Monitoring Options:
  --enableFreeMonitoring arg            Enable Cloud Free Monitoring
                                        (on|runtime|off)
  --freeMonitoringTag arg               Cloud Free Monitoring Tags

Windows Service Control Manager options:
  --install                             Install Windows service
  --remove                              Remove Windows service
  --reinstall                           Reinstall Windows service (equivalent
                                        to --remove followed by --install)
  --serviceName arg                     Windows service name
  --serviceDisplayName arg              Windows service display name
  --serviceDescription arg              Windows service description
  --serviceUser arg                     Account for service execution
  --servicePassword arg                 Password used to authenticate
                                        serviceUser

WiredTiger options:
  --wiredTigerCacheSizeGB arg           Maximum amount of memory to allocate
                                        for cache; Defaults to 1/2 of physical
                                        RAM
  --zstdDefaultCompressionLevel arg (=6)
                                        Default compression level for zstandard
                                        compressor
  --wiredTigerJournalCompressor arg (=snappy)
                                        Use a compressor for log records
                                        [none|snappy|zlib|zstd]
  --wiredTigerDirectoryForIndexes       Put indexes and data in different
                                        directories
  --wiredTigerCollectionBlockCompressor arg (=snappy)
                                        Block compression algorithm for
                                        collection data [none|snappy|zlib|zstd]
  --wiredTigerIndexPrefixCompression arg (=1)
                                        Use prefix compression on row-store
                                        leaf pages
جالب است بدانید که MongoDB از تنظیم کردن آپشن های خود با استفاده از configuration file پشتیبانی می کند. با استفاده از این روش می توانید رفتار دیتابیس مربوطه را کنترل کنید. mongod یعنی همان MongoDB server پیکربندی های پیش فرض را که در فایل کانفیگ لحاظ شدهاند، مورد استفاده قرار می گیرید. در ویندوز مسیر این فایل install directory}binmongod.cfg و در سیستم عامل مک او اس /usr/local/etc/mongod.conf یا /opt/homebrew/etc/mongod.conf می باشند. در سیستم عامل لینوکس نیز این فایل در مسیر /etc/mongod.conf قرار گرفته است. فایل های پیکربندی و یا configuration file مربوط به mongod از فرمت YAML استفاده می کنند. چیزی که در تصویر زیر مشاهده می کنید فایل mongod.cfg است که در ویندوز نشان داده شده است.

نمونه ای که در قسمت زیر مشاهده می کنید، یک فایل پیکربندی ساده است که ممکن است بخواهید برای پیکربندی کردن mongod server خودتان از آن استفاده کنید.
systemLog:
   destination: file
   path: "/var/log/mongodb/mongod.log"
   logAppend: true
storage:
   journal:
      enabled: true
processManagement:
   fork: true
net:
   bindIp: 127.0.0.1
   port: 27017
setParameter:
   enableLocalhostAuthBypass: false
برای ارسال نظر لطفا ابتدا وارد حساب کاربری خود شوید. صفحه ورود و ثبت نام